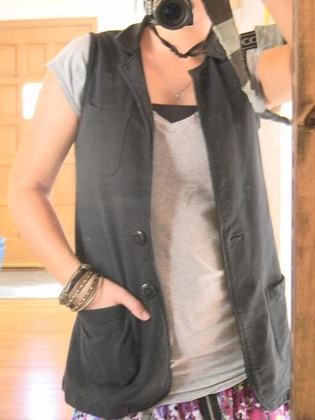
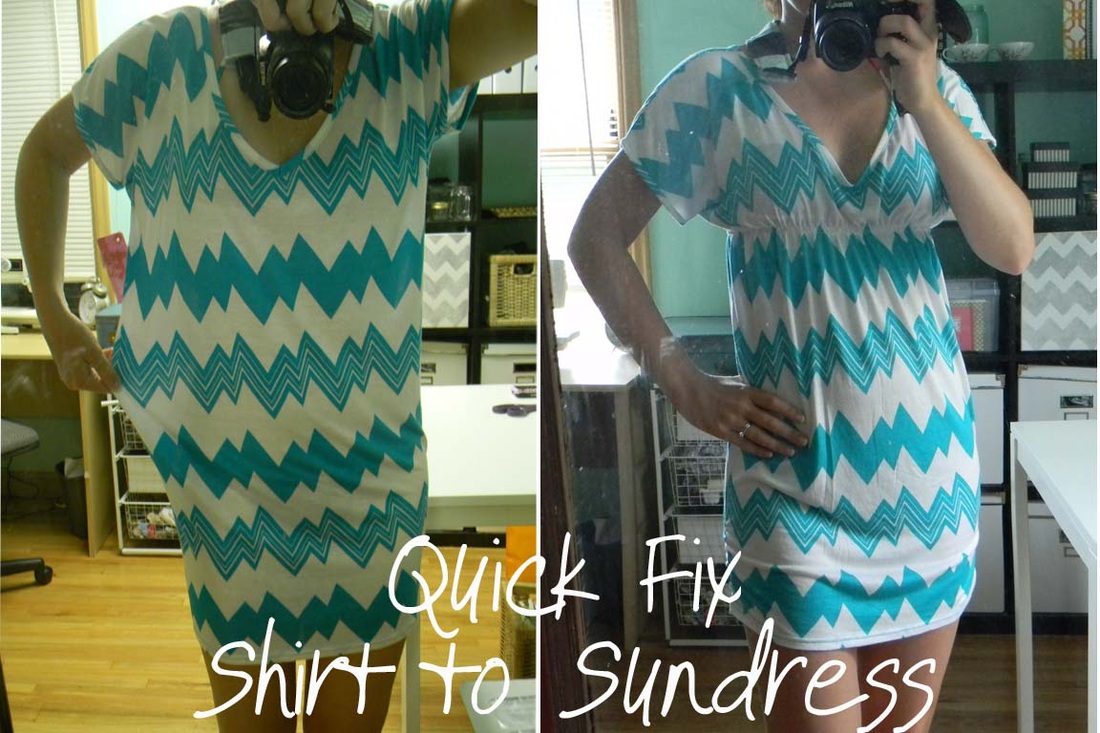
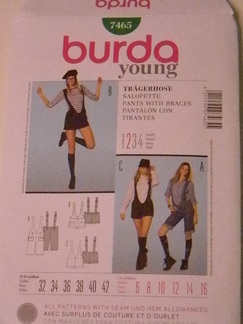
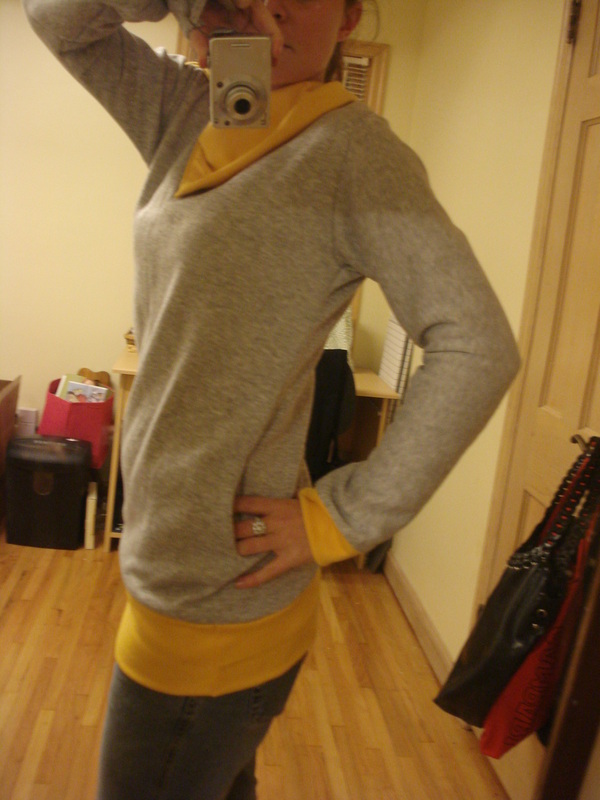
This is going to be a quickie post for a quickie project! Project Runway Season 10 is in full swing, which means my sewing itch is in full effect as well! Hubby and I have been busy with house projects so I have not had any spare minutes for random fashion sewing sprees. I was inspired by this picture on Pinterest (imagine that!) : 
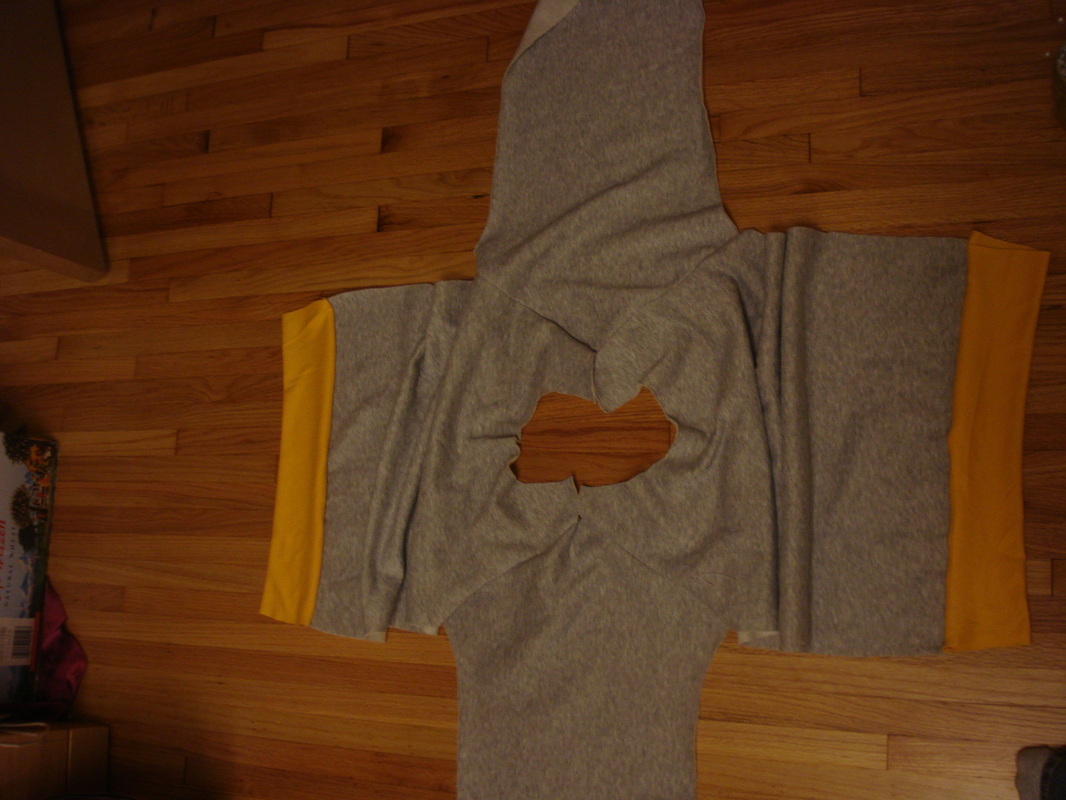
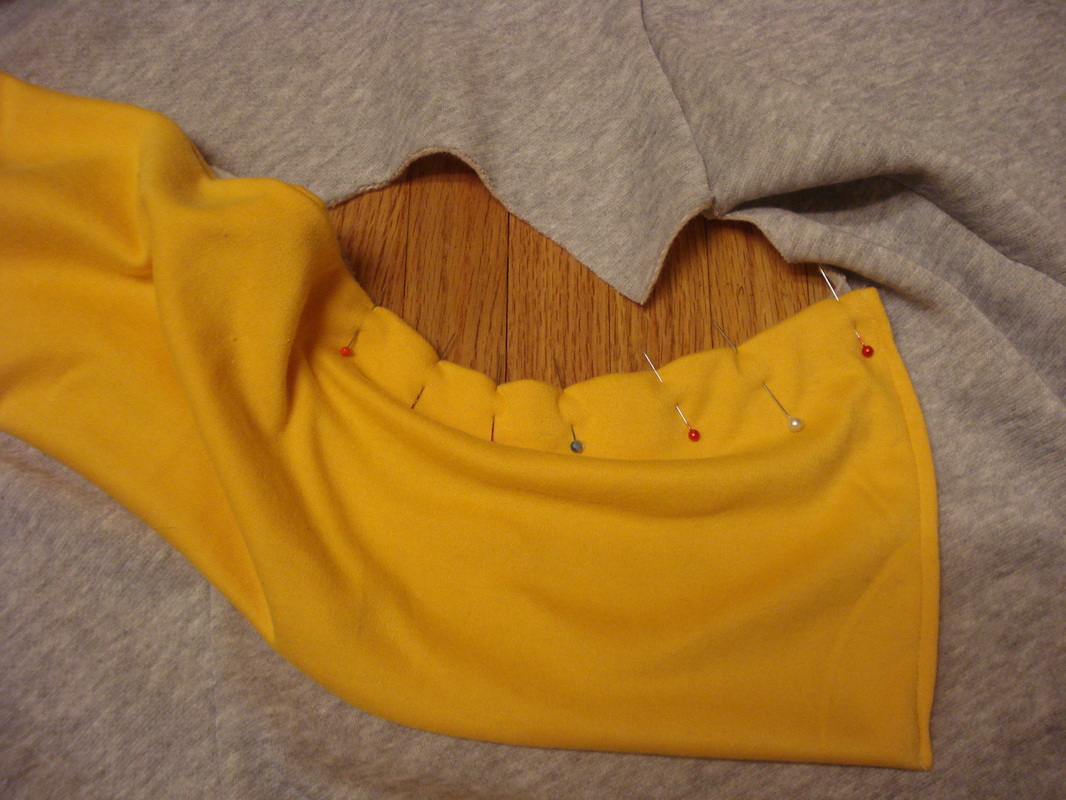
I thought, cute vest, I have a few old blazers that I don't wear, wonder if I could make this?! I also was itching to play with my SketchBook program on the iPad again. :) So here is what I did: 
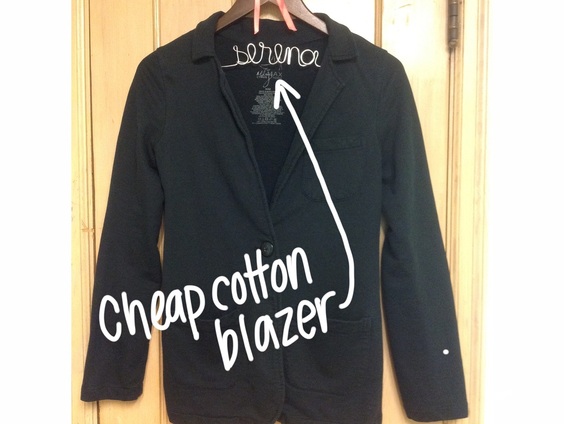
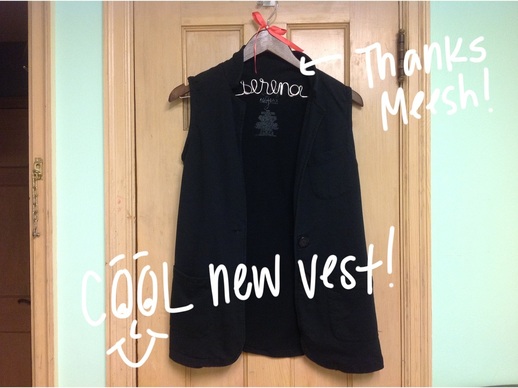
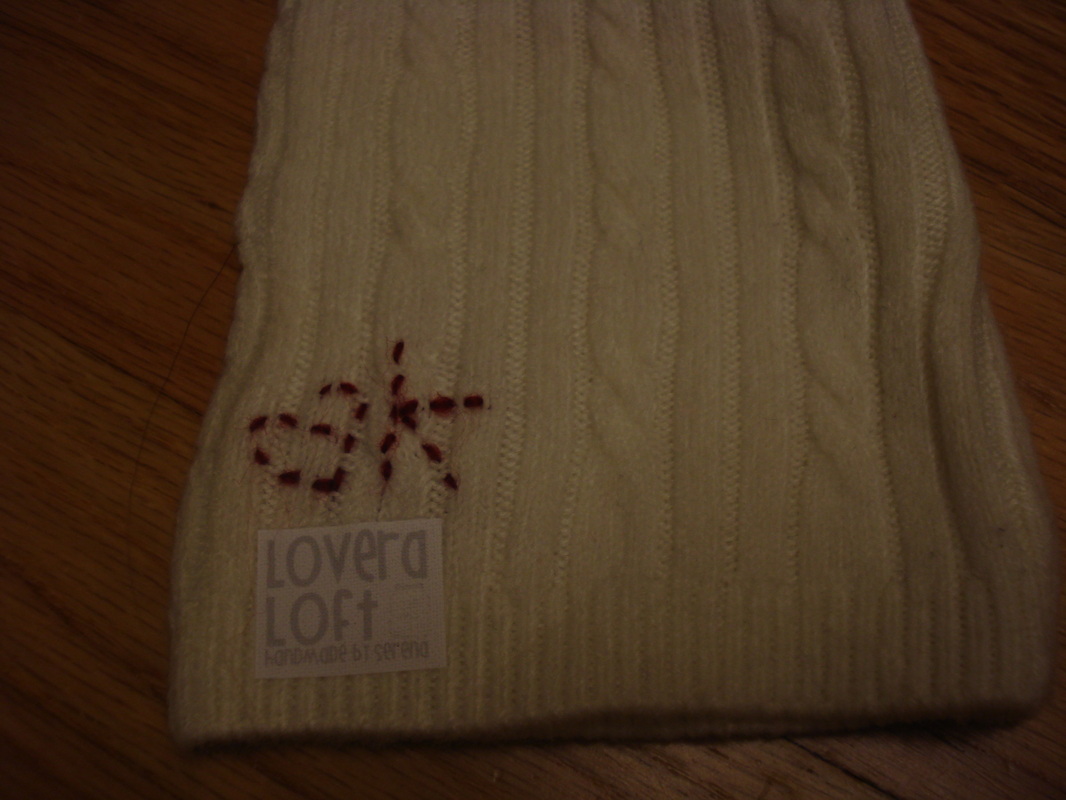
Above I am pointing to the label as being "cheap"... not the awesome hanger craft friend Meesh gave me for being her bridesmaid ;-) Thanks Meesh. it's so perfect for my blog I can hardly stand it!!! So the cheap label is Miley Cyrus from Walmart...but it gets better...I got it from the thrift store! So basically sooooo cheap they should have paid me to take it ;-) 
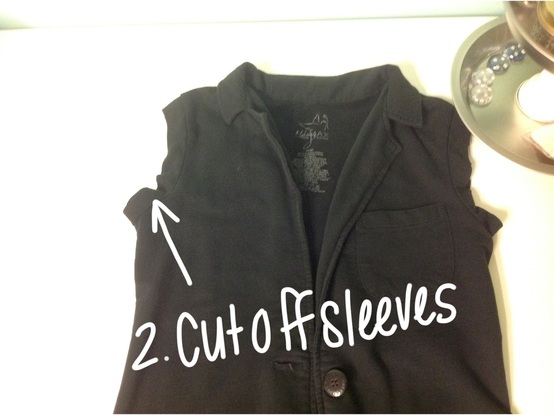
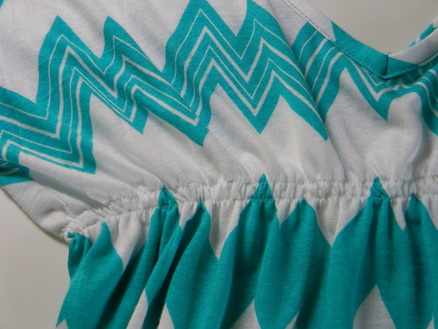
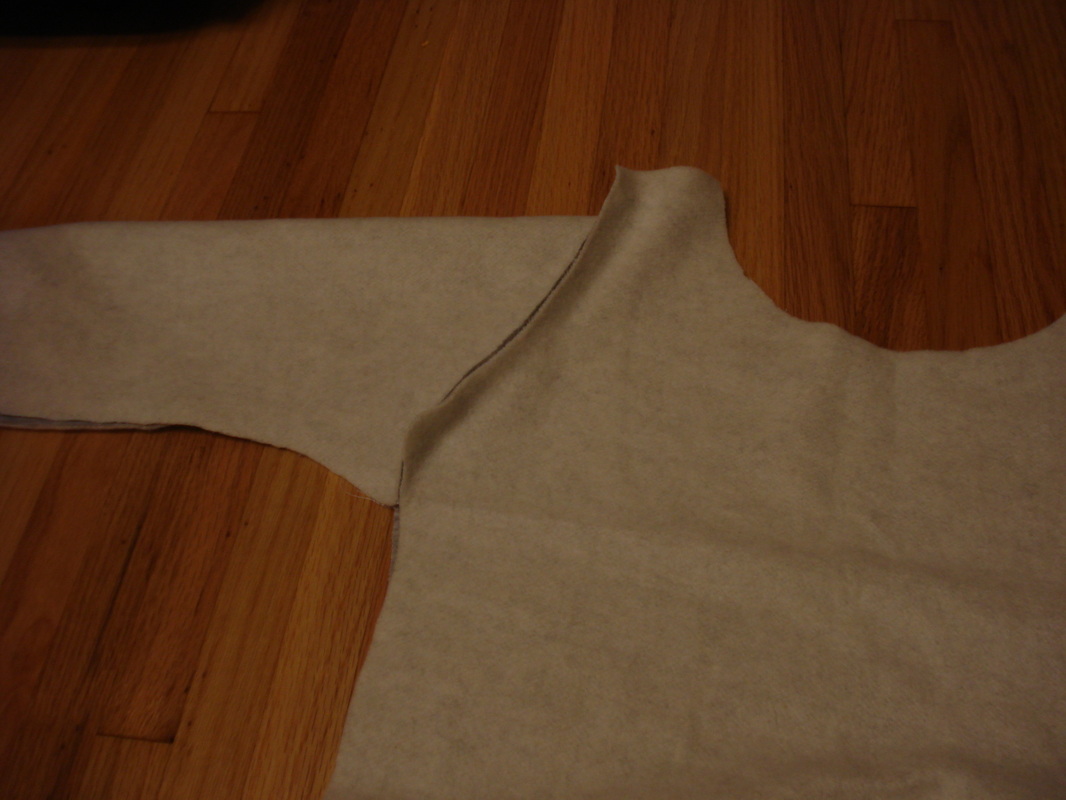
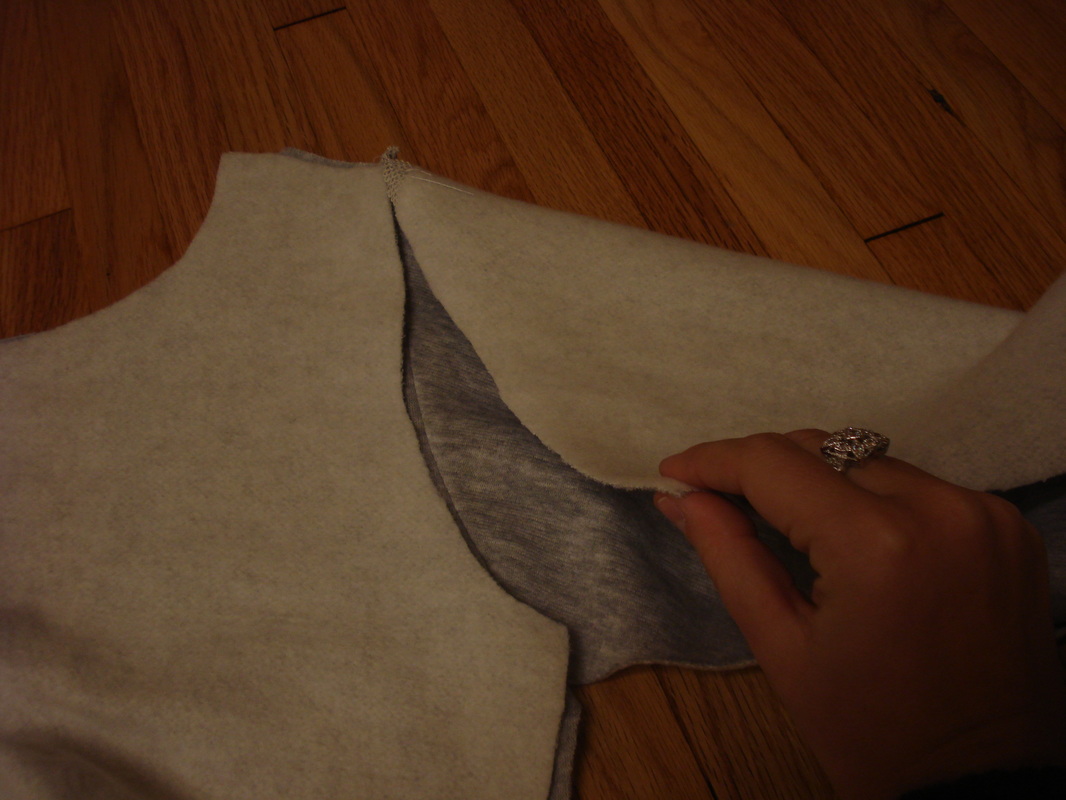
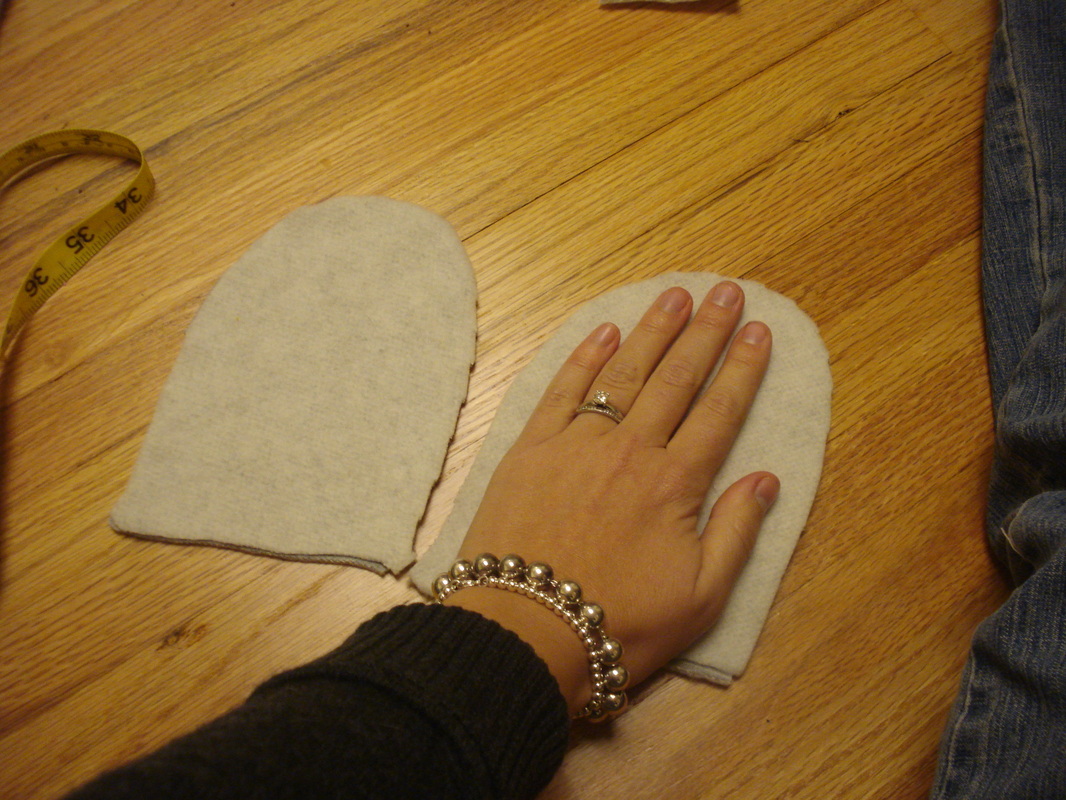
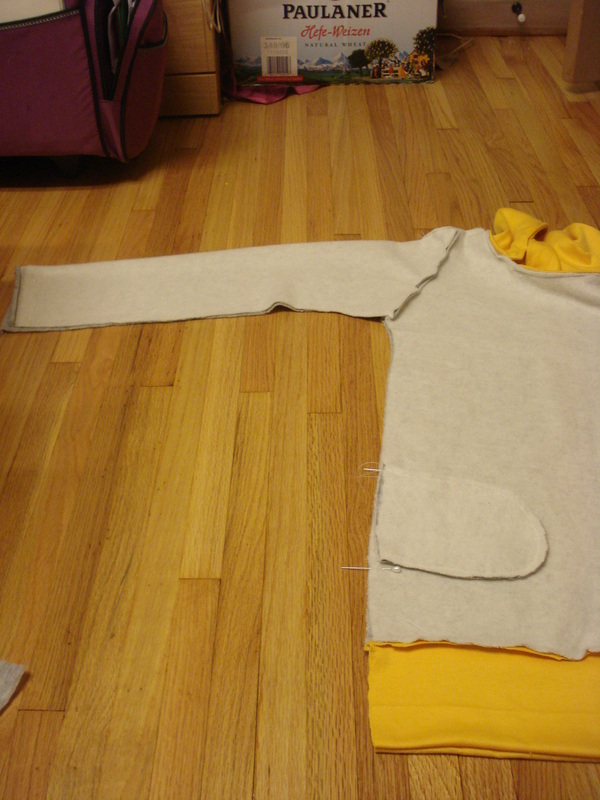
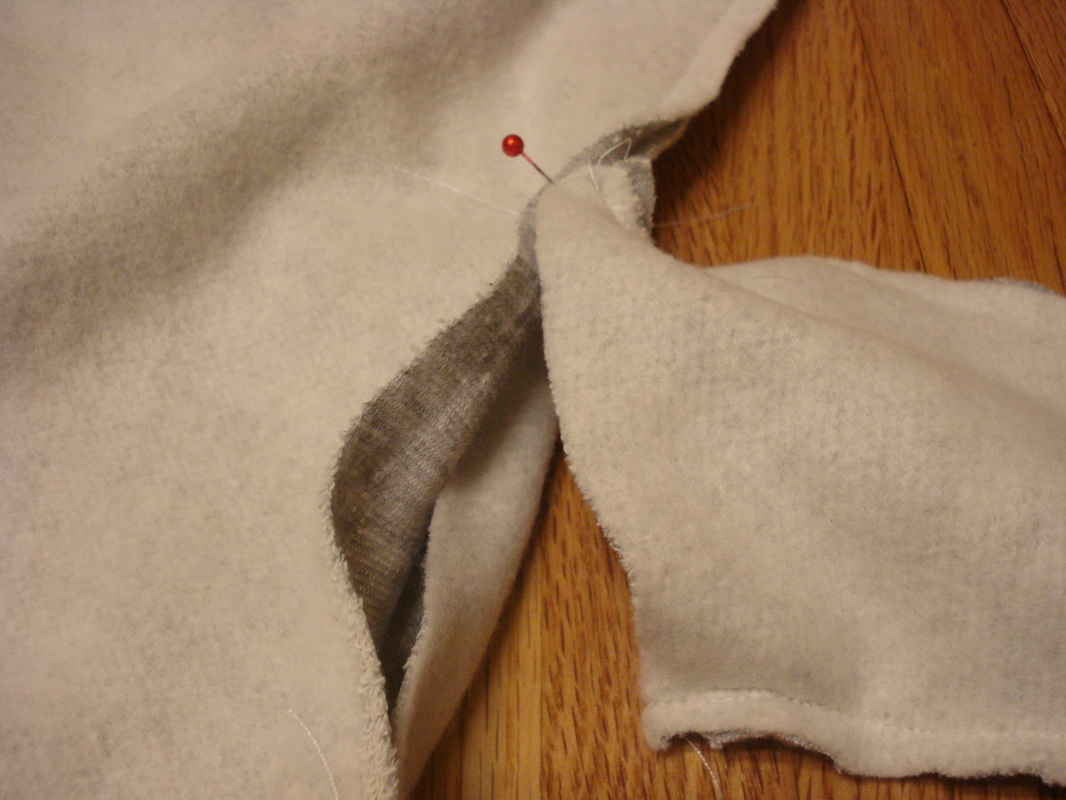
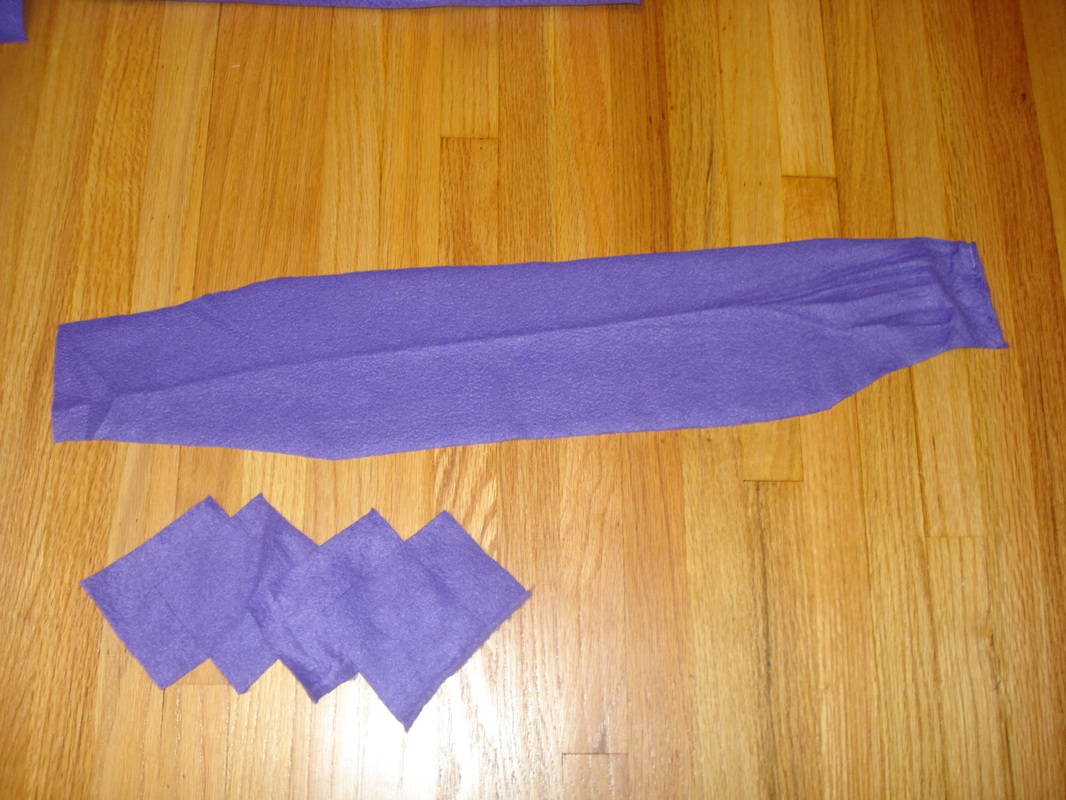
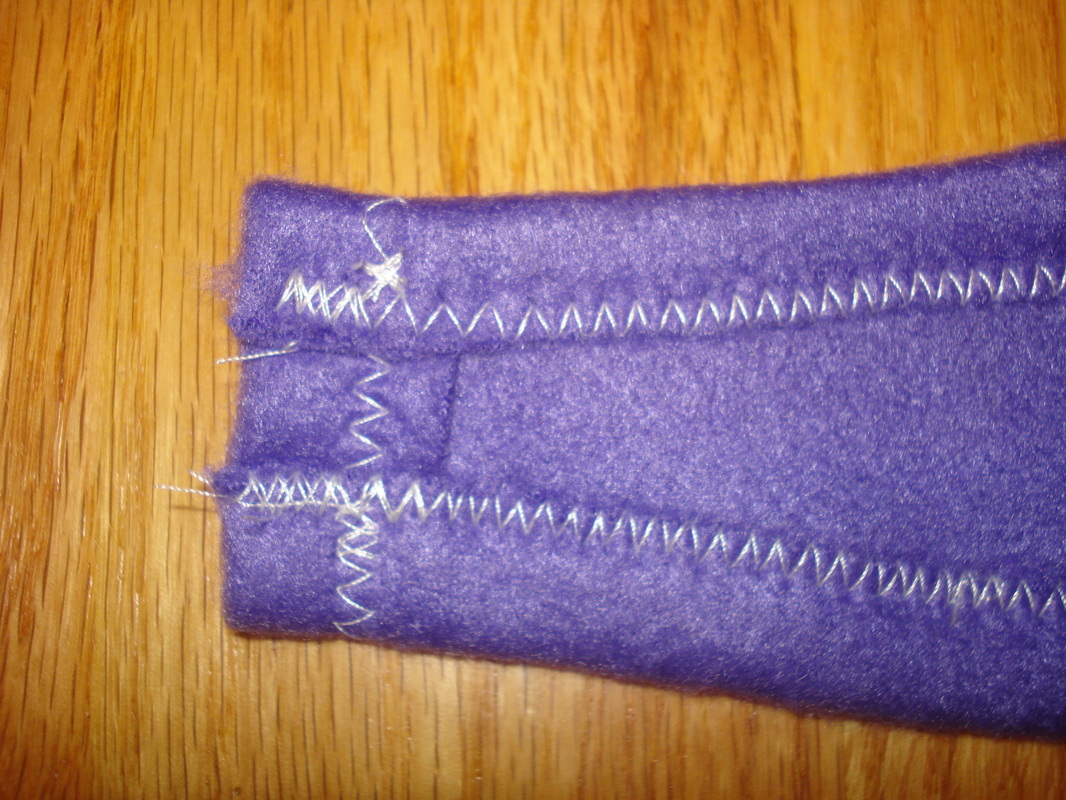
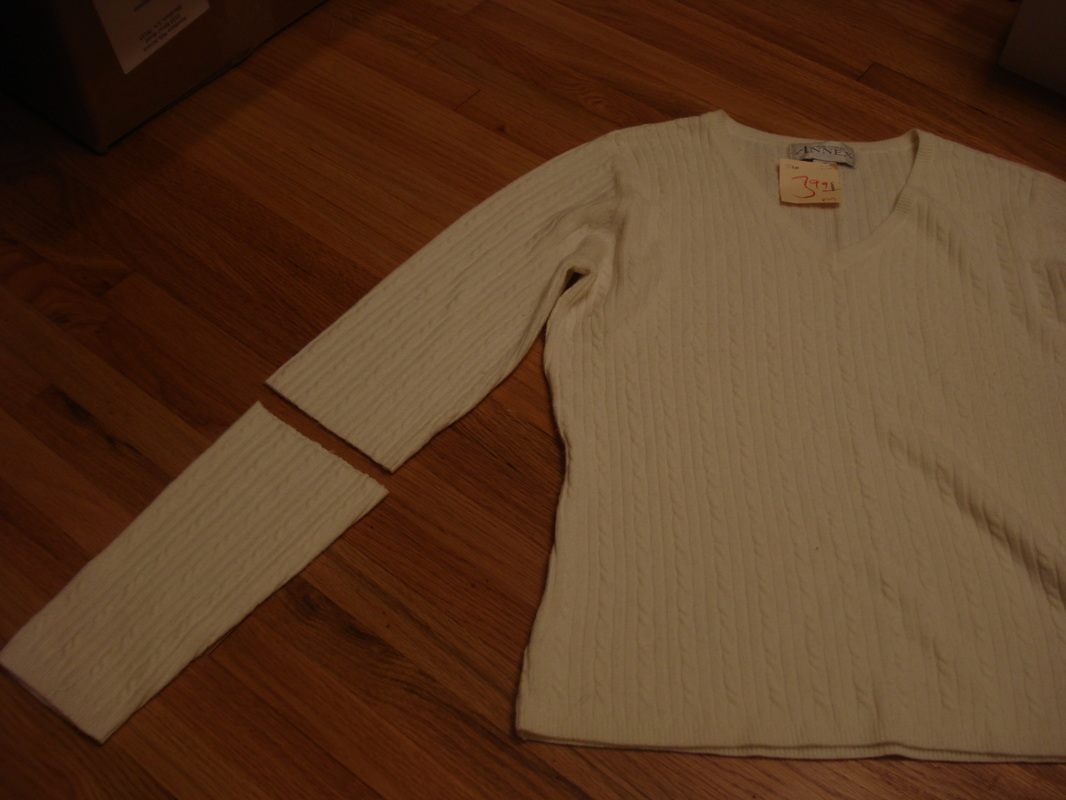
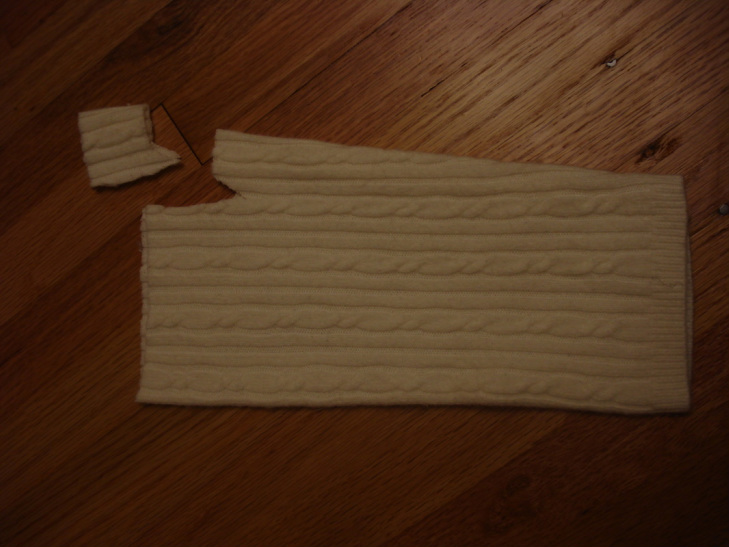
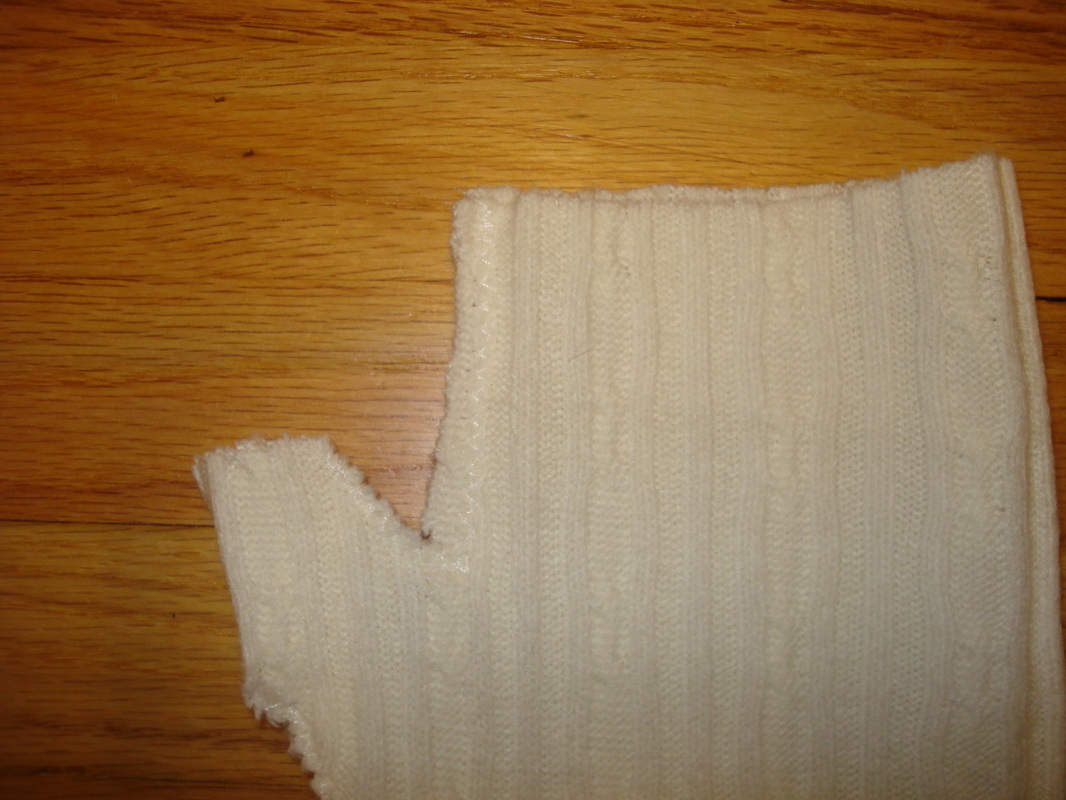
When I cut the sleeves off (above) I left about 1 inch beyond the sleeve seem. This was enough to fold inward and sew down. (below) 
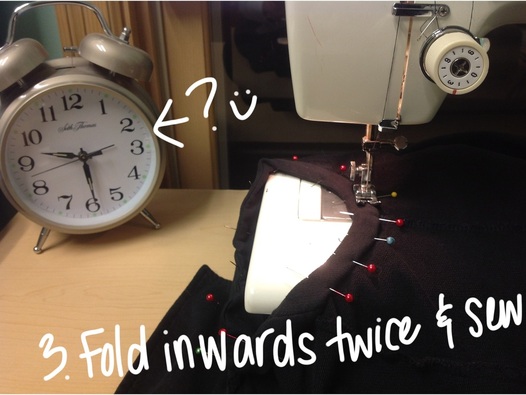
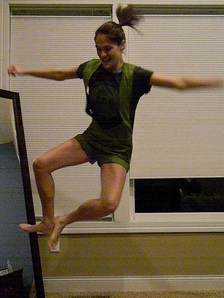
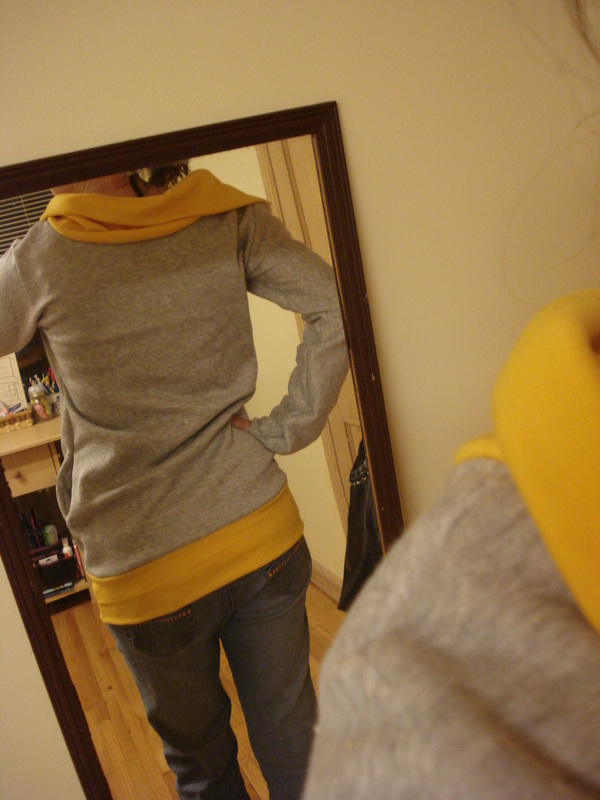
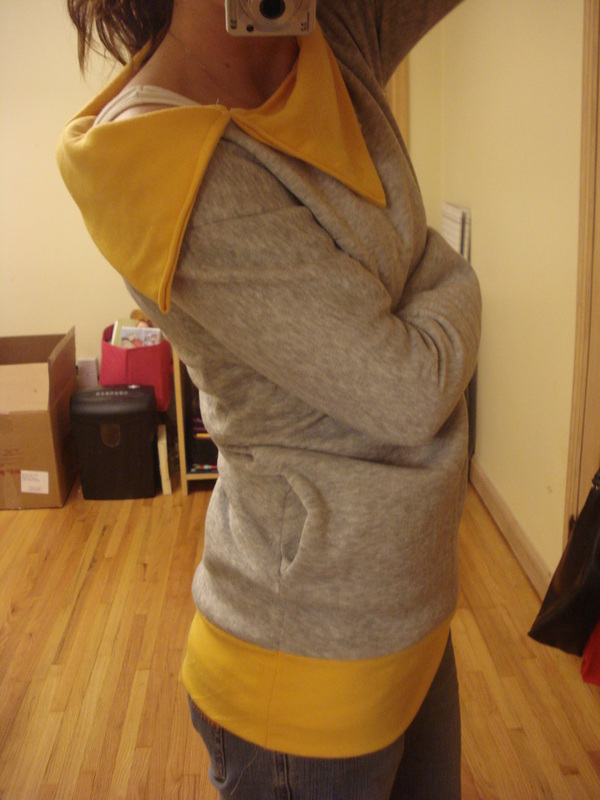
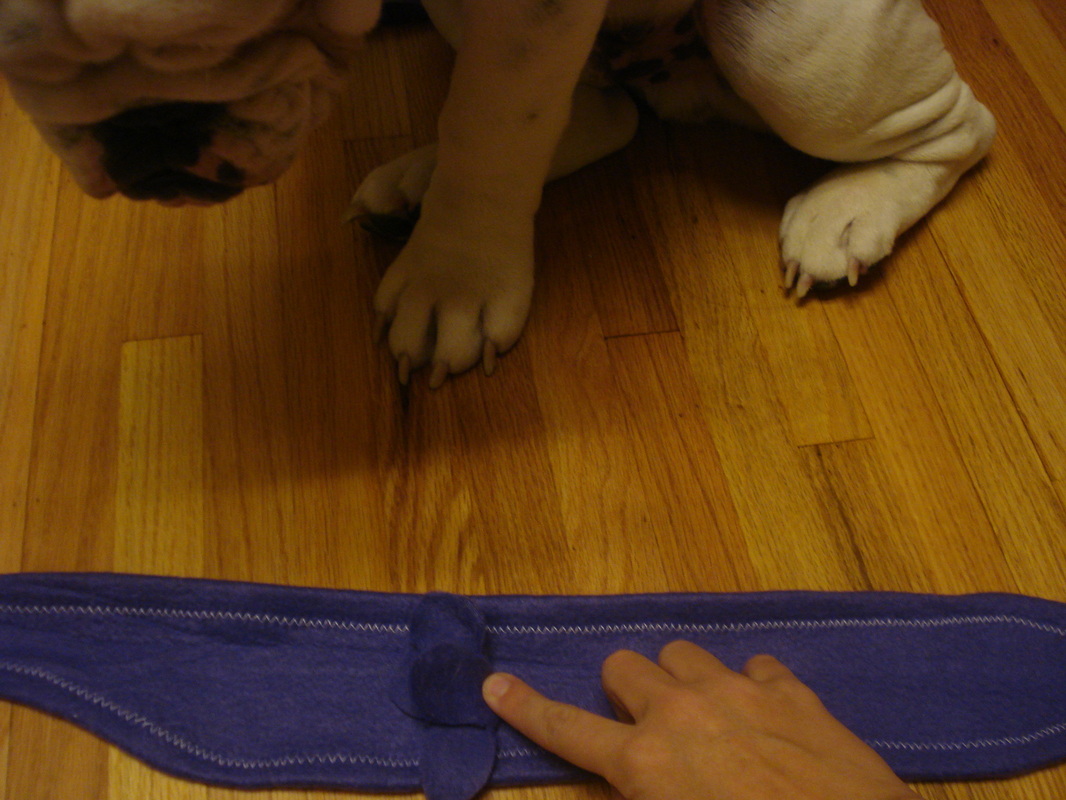
Note the time above? No wonder I have not been making it to my 6:00am BodyPump class at the Y like I was last year!! 
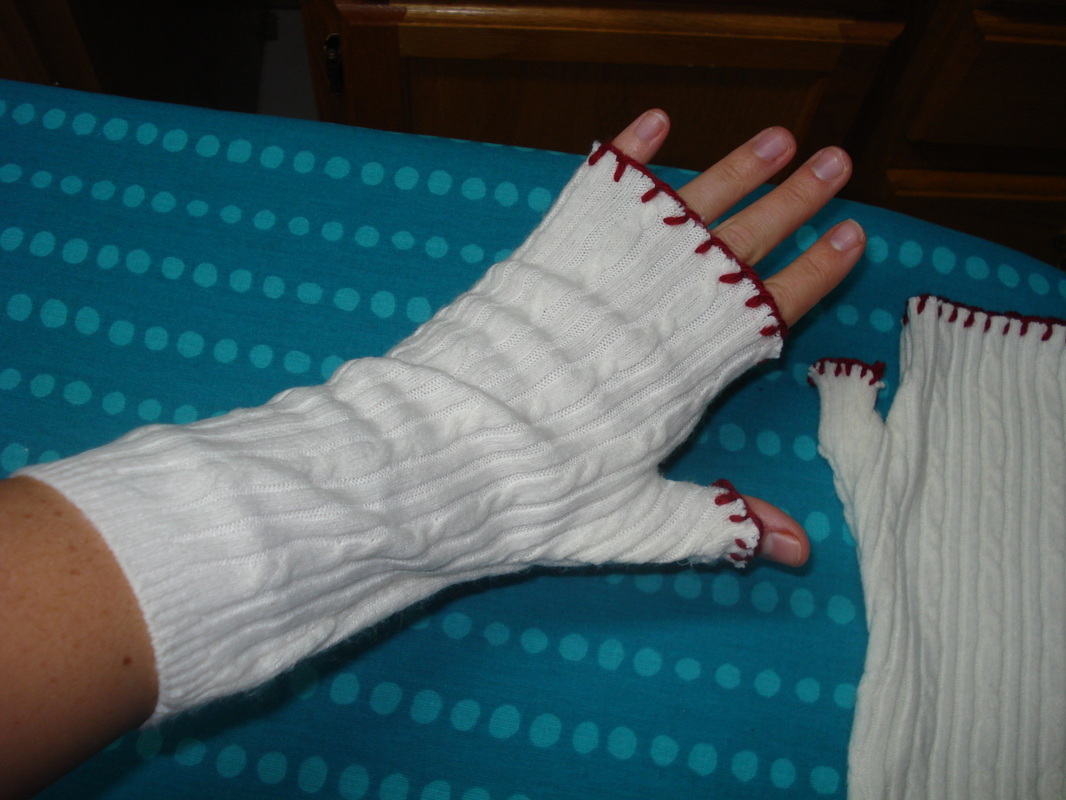
That's it! Anyone else get inspired by reality TV? :)
2 Comments
With our new purchase of a pontoon boat this summer I quickly realized that I have a lack of easy sundresses in my closet. A sundress has such a simple shape that I knew I wanted to fashion my own instead of buying. This is a very easy sewing project and took almost no time at all. 1. Find a "shirt" (not sure if mine was a shirt or dress to begin with). This one was on clearance at Target for $5.38! I LOVE when there are stickers on top of stickers on a tag, a little mountain of savings! If that is a marketing ploy---you get me every time!! Haha! 2. Use regular thread as your top thread, and loosely wind elastic thread for the bottom on your bobbin. 3. Determine where you want the dress to be cinched in at the waist. I was lucky and could just follow one of the zig zag lines. 4. Sew (with the elastic thread in the bottom) all around the waistline. I sewed with the right side of the fabric facing up, so that the elastic thread was on the inside of the dress. I sewed around 2 times, but more times around would make for a wider waistband. 5. For the bottom, to jazz it up a bit I sewed (again with the elastic in the bobbin) a straight line about 5 inches up each side. This gathered up the bottom sides. :) Yay! Can't wait to make more sundresses! Let me know what you think! Anyone else get confused as to what is a shirt and what is a dress lately?! Hehe!
My poor friends that have recently had little bouncing baby boys, "What, they don't want a flowery headband?!, No to the little dress made from a pillowcase?!, What about a fluffy pink tutu?!" There are sooooo many cute little girl crafts out there--it's not my fault!! So I finally found an adorable little boy craft and it actually turned out cuter than a majority of the girlie things I have made recently! It helps when you have a handsome little one-year-old model like my little J-Man ;-) It also helps to have awesome photos from photo-friend Allison!! Check her out, she's local and amazing!! allisontemplephotography.webs.com
Onesie Suit Vest: Fabric: I was lucky enough to find this gray suiting fabric in the remnants section at the fabric store. Remnants are pieces less than 1 yard (I think) and they are always 50% off. You do not need much fabric for this project, so check there first. I also used some white lining fabric to line the vest. I think this is important to give the vest a little more thickness. However; next time I might use a matching gray so that it doesn't stick out as much, but white is what I had at home, so that's what I used. How to: The tutorial I followed is from B is for Boys. I followed the tutorial pretty much exactly and it turned out great! Tips: *Don't skip the pressing (ironing) or top-stitching. These two steps help it lay very flat and give it a professional look. *Make sure the buttons only go through the two flaps of the vest and not all the way through the onesie. More room for the little guy to wiggle...cause we know that's unavoidable! *I was worried that since the vest fabric was non-stretch that this would be a problem on the stretchy onesie, but it didn't seem to be. When I was sewing, I was just conscious to not pull the onesie fabric. I also wondered if it was stretchy enough to fit onto my little J-Man, and judging by the fact that he wore it for his 1 year pics I'm guessing it was! :) Now, I know I can't take all of the credit for those awesome photos (I guess some of the cuteness comes from photo-friend Allison, and maybe some from little J-Man himself...) but I still was so elated to read comments on these photos on facebook. It is such a natural high to have positive feedback on something you have created with your own two hands. Even though the idea wasn't originally mine, I really get pleasure when people appreciate my work. I told Alex, "I could ride those comments for a whole week!" Haha, life's little pleasures! So, anyone have any other little boy crafts? I could use a few more up my sleeves, because baby years with our group of friends has only just begun.... duh duh duuuuuhhhnnn! Sorry craft friend Meesh...this picture just captured too perfectly my elated feelings about pattern comprehension!! Plus you are a really cute leaping leprechaun!! I feel a little guilty after all the bad mouthing I did about patterns in my last post. I came across a little like I was better than patterns and more creative, which I suppose I still think...but I have a new appreciation for sewers that can easily read and interpret the crazy mess of a map that is a pattern. Seriously, I pride myself in being very visual spatial and can tell you in a heartbeat whether I am facing north, south, east or west... however, looking at that pattern made me feel like I was attempting to navigate a foreign planet (perhaps the one shorts are made on). Luckily I had regained my teacher's patients and was ready to sit, focus, think and really understand a pattern. I also had the support of craft friend Meesh who has also decided to take on the challenge of the leprechan jumper (as we are now calling it). This is the leprechaun jumper: Here are a couple of things that I learned about patterns:
1. On the package it gives you fabric suggestions. If you know fabric types you can always substitute for something similar. For example, this pattern called for flannel or denim (so, something non-stretchy). Michelle bought corduroy and it seems to be working just fine. 2. Many patterns have a couple of different choices to the outfit. For example, sleeves or no sleeves, shorts or pants, pockets or no pockets. On my pattern there was a choice A, B or C. I was following outfit C (the easiest, ha) so throughout the whole process I had to make sure I was following directions for "C". 3. The sizes listed on the package are NOT the same sizes as, let's say, Gap. I am a size 12 in pattern world...which is different than Gap sizing, which is different than wedding dress sizing, which is different than Walmart sizing...etc.! You get the picture. So measure yourself before buying a pattern, measure your hips, waist, bust, inseam, etc. and take the measurements with you. Your size on the pattern determines how much fabric you will need to buy. 4. When cutting out the pattern pieces, your size determines what size pieces you cut out. There are different lines (like dashed or dotted) and you follow the one for your size. There should be a diagram on the instructions or on the pattern pieces themselves. 5. There is a diagram showing you where to place the pieces on the fabric to cut out. Check to see if the fabric should be folded, giving you 2 pieces of each piece. Also, some pieces may be required to be placed directly on the fold. 5. No matter how smart you are YOU ARE NOT SMARTER THAN THE PATTERN. This was a hard pill to swallow. I found myself having an inner conversation with myself that sounded like this, "What does that mean...that doesn't seem right... maybe if I just do it like this.... I can skip that step because it doesn't make sense..." Bad pattern following etiquette!! If that is your approach you will later be saying, "Oh THAAAAT'S why they wanted me to do it like that!?!" So, just follow the instructions carefully and if you don't understand something, take a break and come back. Meesh and I could not figure out why the "back strap" in the directions picture did not look like the same shape we had cut out. After we took a macaroni break we realized that the 4 straps we had cut out were actually all front straps and that a totally different unlabeled piece was our back strap! Just needed a brain break!! Those are just a few pattern following tips I wanted to share. Our leprechaun jumpers are about 80% complete, including a zipper (properly sewn for the first time!!) Unfortunately, I lost a knob to my machine in transport last weekend so I am paralyzed at the moment. I didn't realize how dependent I had become on my machine! Luckily this is just a good excuse to head to my Betty Crocker Seamstress Momma's house to borrow her machine and her pattern knowledge to finish! Can't wait to share the final product! I will have to remember to snap some pics BEFORE it becomes covered in Jameson Ginger-ale! ;-) I need a new category labeled "failed attempts", or "frustration", or "I quit!" :) Let's back track a bit. St. Patrick's day is coming up, which means a deadline, which means an excuse to make something and actually get it done. So I had a vision of a cute pair of shorts and some fun St. Patty's Day suspenders. Shorts, OK, like a skirt with a seam in the middle, right?.......WRONG!! Shorts are seriously made on another planet. Once I started really looking at a pair I already own, I could not figure out how they were cut out let alone sewn together. So, although my favorite part of creating something is figuring out how to make it...I was stuck. I had to give in and turn to pinterest. I found what I thought was a good tutorial of how to make your own pattern for shorts. Great, so it wasn't really cheating because I still get to make my own pattern pieces. Only problem was...once I had cut out my pattern pieces according to the tutorial they still were foreign to me! Which way was up?! Is this the leg hole or the crotch seam?! Arg! Still, couldn't give up so I gave it my best shot and..... It's hard to tell in the picture but here is how they fit: 1. Super tight on my thighs 2. Baggy in the front, and 3. Permanent weggie on both sides Just what every girl wants!! So flattering!! Worse news is that I was using that nice green satin left over from an old skirt project...and I didn't have quite enough left to make another pair. Rats! So another lesson learned: Lovera Loft Lesson Learned: Don't use special fabric when trying a new pattern if you only have a little bit left. Alright, so lesson learned, on my second attempt I used an old button up of the hubby's as my fabric. This time I was following a different tutorial, but decided that I needed to make the back middle seam longer that the front to accommodate for my white girl- Serena Williams booty. Amazingly this went even worse! I ended up with this extra flap in the crotch that I had no idea where to sew it to! Hahaha! Time for a phone call to momma (to vent and hear what I want to hear). She confirms my frustration with shorts & gives me the go-ahead to get a...shhhh.... "store bought pattern". "No fun", I think to myself. But I also cannot let the shorts win, not an option!! Once I start a project I have no choice but to finish it. Even if it means saggy crotch and pinching thighs. I just have to finish to move on. So this morning, after yet another affirmation that shorts are difficult from sewing guru friend Erin, I was off to Joann's to sift through the patterns. Speaking of guru Erin, I had a super thought today when I was reading all of her sewing tips to me on facebook...I need to dedicate a post or two to her expertise!! Anywho,when I get to the store and start searching through the millions of options I actually decide that as long as I am buying a pattern, I might as well try something a little bit more challenging (not that the shorts adventure wasn't challenging enough). Here is the pattern I picked up: Those don't look like shorts you say! No, I couldn't ignore the "irish" feel to this jumper...plus it was on sale and claims to be "easy". Now patterns for me induce a little bit of anxiety. I am very very visual spatial, but patterns seem to be from the same planet as shorts. So wish me luck. Tomorrow I attempt the shorts (turned jumper) for a third time...third times the charm?
For my guru Erin post...anyone have any good sewing questions? Any hilarious mistakes you want to know if she has made before? One way to get a project done is to have an approaching deadline, anyone feel me?! So for this dress I had a FREE trip to CABO SAN LUCAS to help promote my speediness! Alex's job with Pernod Ricard flew about 30 of us to Cabo for a vacation; and although it was an all expenses paid trip, I still did not find the desire to spend a lot of dough on a new wardrobe--enter the tank top maxi that has been on my list. Here is the final product: (I felt comfortable modeling it thanks to a couple of sun-kissed days on my normally see-through white Norwegian skin!!) So there is a hilarious story behind this dress; however, an important lesson was learned. As you might know, I enjoy the process of creating and figuring out things myself rather than following a pattern or tutorial step by step. So my STYLIN sister in law, Nikki, wore a dress similar to this last summer and I naturally took a real close look and filed it into my brain's section labeled, "I could make that". I knew I would need a tank top and a light fabric like chiffon, and figured out that I needed to learn how to sew with elastic thread for the waist. So I found a tutorial that I could "follow": http://asmallsnippet.blogspot.com/search/label/sewing Here is where it gets good. I followed the tutorial pretty closely and cut my tank top, and cut a large rectangle for the skirt & lining. I now realize that I inferred that the skirt shape was a rectangle because once I had the full dress put together the bottom was so small around my ankles I had to take tiny little geisha girl steps!! hahahaha I wish I would have been filming at this point, might have gone viral!! So then it gets worse because I decided to add a small triangle piece to the bottom in the back, which did make the bottom wider, but also made it look like a bustled wedding dress!! Yuck!! Sooooo lesson learned, when using non-stretch material, always cut your skirt in a triangle/trapezoid shape!! This is how I ended up with this first dress, now short. Luckily it was a fixable mistake. So if you want to attempt your own short or long maxi tank dress here is what you need: tank top ($9 at Target) elastic thread (woven loosely on bobbin) 2 yards chiffon fabric (I had some left over) 2 yards lining fabric (again, had left overs) 1. I cut my tank top about 6 inches down from the armpit. 2. Here is how I cut the second skirt (the trapezoid shape). I measured around my waist 1.5 times and got 42". So since I was cutting a front and back piece for my skirt I divided that number in half to get my waist measurement of 21" for each piece. Cut the same skirt pieces for the lining. 3. Place the front and back pieces of the skirt right sides together and sew up the sides (where my pink and yellow tape measures are in the picture above). 4. Place the front and back pieces of the lining wrong sides together and sew up the sides. You want wrong sides together (if there is right and wrong of your lining fabric) because you wan the seams to face the inside of the skirt, not be on your legs. 5. Put the lining inside the skirt (with the seams facing each other so the lining seams aren't rubbing on your legs) . Now you are ready to sew with the elastic thread! Use the blog I mentioned earlier in this post for clarification. Wind the elastic thread loosely around the bobbin and sew around the waist (sewing the lining and skirt together). 6. The fabric should naturally gather as you sew, no need to pull or push anything. Now you are ready to place your tank top inside the gathered waist. I like the look of the rough edge on top of the tank top so I sewed right on the outside of the skirt and tank. Don't forget to use elastic thread in the bobbin again! This was a little awkward to pin, but I just took my time and wrestled with it a bit until I got it. 7. Once you have the skirt pinned to the tank you can sew with elastic thread again right next to the first stitch. Then hem the bottom of the lining and skirt and your done!! Let's hope you don't have a geisha problem like it did ;-) Let me know what you think!! What kinds of things motivate you to get a project done? Anyone else have any comical sewing mistakes lately?!
A LONG over due post...it's the yoga mat bag!! This idea sprang up when I had a secret Santa with my workout buddies at the YMCA and what a better diy gift for a gym friend than a mat bag! I scored some cute fabric (at Joann Fabrics) and followed this tutorial: http://www.craftster.org/forum/index.php?topic=244983.0 The tutorial is pretty easy to follow and I pretty much stuck to the directions. Here is my final product! You are even getting a little sneak peak into my craft room renovation!! :) I am now on my third bag..because what better advertising than toting my own cute bag around at the Y 5 DAYS A WEEK ;-) Yes, now you know where my free time goes when I am not in my craft room...sweating (or in my case not sweating) with my girls!! Amazingly enough, I am not sick of making the bags yet...so get your orders in soon if ya want one, because I'm sure it won't be long until I'm over it and will be moving on to the next creative endeavor ;-) Haha
Sorry had to slip in my first pun...I do love a good cheesy line! :) Sew, (haha, I will refrain from using it the whole post, promise!) I made this sweatshirt as a Christmas gift and really, really struggled with giving it away. The stand up collar didn't work as expected but actually turned into an awesome off the shoulder look which I love love love right now! Any 80's fashion comeback is A-OK in my book!!! Here is what I did: 1. This is the second sweatshirt I have made and since I was giving this one away I decided to make a pattern of sorts in case I want to make another one at some point...which I definitely do!! For the pattern, I used tissue paper and traced over another sweatshirt. 2. Next I cut out the pieces from......get this..... my thrift store find fabric!!! Whoot whoot!! It is not often that I find up-to-date fabric that does not look like leftover remnants from grandma's davenport reupholster project 20 years ago. And no, Meesh, it's not pink...it's yellow and gray! ;-) 3. For the sleeves you can see that I put the top part of my pattern on the fold so the only seam is under the arm. This probably isn't anything new to some of you...but when I realized this it was like Christmas morning opening my moon shoes at age 9! 4. The picture below shows the 2 waistband pieces cut out. You can see that the bottom is on the fold as well. 5. Sew one waistband piece to the front and one to the back. Note, you line up the raw edges of both the waistband and the front and back pieces. Place the waistband on top of the ride side of the front and back pieces ( It looks like my picture might be wrong...sorry). This is what you will have up to this point: 6. Next, I sewed the arms on. Hard to explain, but I sewed kind of around in a circle. Always sew the right sides together, pin half of the sleeve (making sure the fold is at the top of the shoulder opening) to one side of the FRONT piece. Then sew the other half of that sleeve to the BACK piece. Trust me, at this point I usually sit and stare at my work and do some talking to myself... hopefully the pictures below will help: The picture directly above is what you should have after sewing the sleeves to the front and back pieces. 7. Next cut a piece for the collar. Notice it is doubled up with the fold on the bottom like the waistband. OK, here is where I have to apologize. This is the point where I got excited because it was the creative part of the project and so I took far less pictures... so sorry! I will try and remember what I did in my creative blackout period. It looks like the collar piece was about 28 inches long, that was probably the length of around the neckline...? How's that for exact. :-/ You should note that the sweatshirt I used as a pattern had a kind-of turtle/cowl neck... so the neckline was wider than normal. 8. Sew... :) it looks like I hemmed the two short ends of the collar and then turned under the long raw edges as I sewed the collar to the right side of the neckline. I started the collar off center in the front. I was going to have a button closure to make a big stand up collar....but the yellow fabric was not stiff enough (and I have yet to experiment with fusible fleece or whatever that stuff is) so it became a "lay-down" collar ;-) But like I said, I LOVE it!! 9. MY FIRST POCKETS!! Before sewing the front to the back, I decided I wanted to take a shot at pockets. So I cut out four pieces about the size of my hand. 10. Ugh, sorry to say I can't really remember how I sewed the pockets to the sweatshirt. The picture below I think is showing that I placed pins at the top and the bottom of where I wanted the pockets and sewed the side seams all the way up the arm, but not where the pockets will go. I must have done some sitting, thinking and self conversing to figure out how to sew the pockets on after sewing the sides together. 11. Below on the right is the pocket. I sewed the right sides together around the curved sides of both pocket pieces and then sewed the two straight edges right sides to the right sides of the bodice. 12. Add wrist pieces just like the waistband pieces if you want....and then snap out of your creative blackout and admire your work! And then in my case, give it away... :( I can't wait to make more and play with different collars/necklines, embellishments, types of fabric.... the wheels are turning!!
Now, I don't really mean FORGET knitting... let me explain my love/hate relationship with the knitting craft genre. The hate comes from the fact that I am such a slow knitter that it drives me crazy. I can sew so much faster than I can knit, and if you know me you know that I am a "results girl" (to quote my BFF from college and it was not referring to crafting, ha) and I am all about getting the project done and checked off the list asap. HOWEVER, I love knitting because it is something I can take with me anywhere. Crafting on the go is really really wonderful, on a long car ride, watching an the 5th extremely entertaining school Christmas program rehearsal, anytime, anywhere knitting can satisfy my crafting cravings! With that said, for this project I was feeling like the results girl and sewed a fleece headband instead of knitting one. Check it out! 1. Measure your head and add a 2/2.5 of inches for the overlap with the button in the back & the seam. I cut the edges a little thinner than the front. Also cut a few squares to make a flower. 2. I folded over the edges and stitched along all 4 sides, but with fleece it doesn't really fray so you may not even need to do this part! In fact, this whole project could be done by hand sewing if you skip this step! :) 3. Cut the small squares into flower shapes. 4. Pick a side and slightly off center for your flower. Fold one flower in half two times and hand sew threw the point a few times. Can you stand Tator Tot helping me?! Still in the curious puppy stage!! :) 5. Continue sewing the other flowers next to the first one. I kind of went in a circle. The fleece is nice and stiff and make a fun "poofy" flower! Love it! Thanks again to my wrinkly drooly model for this shot: 6. To finish I sewed a button on one end and cut a slip for a button hole on the other end. Again, since the fleece doesn't really ravel a simple slit for a button hole works just fine! Two nieces' Christmas gifts in one night... results girl to the rescue!!!
**No animals were hurt in the making of this tutorial, just a little embarrassed ;-) This was a very quick and easy Christmas gift project. Here is what you need: 1 soft sweater from the thrift store, or back of you closet. Scissors Embroidery thread (I used red yarn) Needle Sewing machine 1. Cut off the sleeves of the sweater: Cut out the shape shown below to make a thumb hole. Turn the glove inside out. Sew along the "J" if that makes sense. Leaving the tops open for the thumb and fingers. They were a little looser than I wanted them to be so I also took them in a bit. You can see some of that in the picture below. To finish the tops of the gloves I attempted my first blanket stitch! I did not have any embroidery thread, so I used a thin yarn I had on hand. Ha, "on hand?" Yup, I said it! It turned out OK, but would be better with different thread I think. Here is the tutorial I watched for the blanket stitch: I added initials since these were going to be a gift! You can see my new labels in the picture below... I will show you how I made those in another post to come! All done, and now I get to find another project for the rest of the sweater!! Any ideas? I was thinking a cowl neck warmer, or shoulder shrug...?
|