A LONG over due post...it's the yoga mat bag!! This idea sprang up when I had a secret Santa with my workout buddies at the YMCA and what a better diy gift for a gym friend than a mat bag! I scored some cute fabric (at Joann Fabrics) and followed this tutorial: http://www.craftster.org/forum/index.php?topic=244983.0 
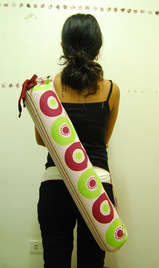
The tutorial is pretty easy to follow and I pretty much stuck to the directions. Here is my final product! You are even getting a little sneak peak into my craft room renovation!! :) 
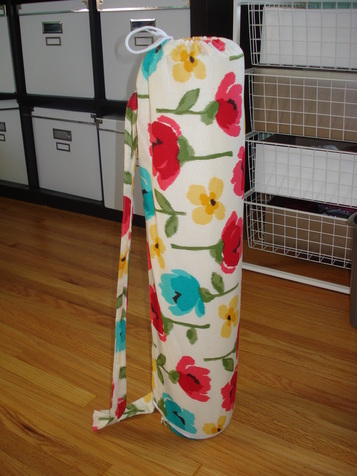
I am now on my third bag..because what better advertising than toting my own cute bag around at the Y 5 DAYS A WEEK ;-) Yes, now you know where my free time goes when I am not in my craft room...sweating (or in my case not sweating) with my girls!! Amazingly enough, I am not sick of making the bags yet...so get your orders in soon if ya want one, because I'm sure it won't be long until I'm over it and will be moving on to the next creative endeavor ;-) Haha
3 Comments
Sorry had to slip in my first pun...I do love a good cheesy line! :) Sew, (haha, I will refrain from using it the whole post, promise!) I made this sweatshirt as a Christmas gift and really, really struggled with giving it away. The stand up collar didn't work as expected but actually turned into an awesome off the shoulder look which I love love love right now! Any 80's fashion comeback is A-OK in my book!!! Here is what I did: 1. This is the second sweatshirt I have made and since I was giving this one away I decided to make a pattern of sorts in case I want to make another one at some point...which I definitely do!! For the pattern, I used tissue paper and traced over another sweatshirt. 2. Next I cut out the pieces from......get this..... my thrift store find fabric!!! Whoot whoot!! It is not often that I find up-to-date fabric that does not look like leftover remnants from grandma's davenport reupholster project 20 years ago. And no, Meesh, it's not pink...it's yellow and gray! ;-) 3. For the sleeves you can see that I put the top part of my pattern on the fold so the only seam is under the arm. This probably isn't anything new to some of you...but when I realized this it was like Christmas morning opening my moon shoes at age 9! 4. The picture below shows the 2 waistband pieces cut out. You can see that the bottom is on the fold as well. 5. Sew one waistband piece to the front and one to the back. Note, you line up the raw edges of both the waistband and the front and back pieces. Place the waistband on top of the ride side of the front and back pieces ( It looks like my picture might be wrong...sorry). This is what you will have up to this point: 6. Next, I sewed the arms on. Hard to explain, but I sewed kind of around in a circle. Always sew the right sides together, pin half of the sleeve (making sure the fold is at the top of the shoulder opening) to one side of the FRONT piece. Then sew the other half of that sleeve to the BACK piece. Trust me, at this point I usually sit and stare at my work and do some talking to myself... hopefully the pictures below will help: The picture directly above is what you should have after sewing the sleeves to the front and back pieces. 7. Next cut a piece for the collar. Notice it is doubled up with the fold on the bottom like the waistband. OK, here is where I have to apologize. This is the point where I got excited because it was the creative part of the project and so I took far less pictures... so sorry! I will try and remember what I did in my creative blackout period. It looks like the collar piece was about 28 inches long, that was probably the length of around the neckline...? How's that for exact. :-/ You should note that the sweatshirt I used as a pattern had a kind-of turtle/cowl neck... so the neckline was wider than normal. 8. Sew... :) it looks like I hemmed the two short ends of the collar and then turned under the long raw edges as I sewed the collar to the right side of the neckline. I started the collar off center in the front. I was going to have a button closure to make a big stand up collar....but the yellow fabric was not stiff enough (and I have yet to experiment with fusible fleece or whatever that stuff is) so it became a "lay-down" collar ;-) But like I said, I LOVE it!! 9. MY FIRST POCKETS!! Before sewing the front to the back, I decided I wanted to take a shot at pockets. So I cut out four pieces about the size of my hand. 10. Ugh, sorry to say I can't really remember how I sewed the pockets to the sweatshirt. The picture below I think is showing that I placed pins at the top and the bottom of where I wanted the pockets and sewed the side seams all the way up the arm, but not where the pockets will go. I must have done some sitting, thinking and self conversing to figure out how to sew the pockets on after sewing the sides together. 11. Below on the right is the pocket. I sewed the right sides together around the curved sides of both pocket pieces and then sewed the two straight edges right sides to the right sides of the bodice. 12. Add wrist pieces just like the waistband pieces if you want....and then snap out of your creative blackout and admire your work! And then in my case, give it away... :( I can't wait to make more and play with different collars/necklines, embellishments, types of fabric.... the wheels are turning!!
Now, I don't really mean FORGET knitting... let me explain my love/hate relationship with the knitting craft genre. The hate comes from the fact that I am such a slow knitter that it drives me crazy. I can sew so much faster than I can knit, and if you know me you know that I am a "results girl" (to quote my BFF from college and it was not referring to crafting, ha) and I am all about getting the project done and checked off the list asap. HOWEVER, I love knitting because it is something I can take with me anywhere. Crafting on the go is really really wonderful, on a long car ride, watching an the 5th extremely entertaining school Christmas program rehearsal, anytime, anywhere knitting can satisfy my crafting cravings! With that said, for this project I was feeling like the results girl and sewed a fleece headband instead of knitting one. Check it out! 1. Measure your head and add a 2/2.5 of inches for the overlap with the button in the back & the seam. I cut the edges a little thinner than the front. Also cut a few squares to make a flower. 2. I folded over the edges and stitched along all 4 sides, but with fleece it doesn't really fray so you may not even need to do this part! In fact, this whole project could be done by hand sewing if you skip this step! :) 3. Cut the small squares into flower shapes. 4. Pick a side and slightly off center for your flower. Fold one flower in half two times and hand sew threw the point a few times. Can you stand Tator Tot helping me?! Still in the curious puppy stage!! :) 5. Continue sewing the other flowers next to the first one. I kind of went in a circle. The fleece is nice and stiff and make a fun "poofy" flower! Love it! Thanks again to my wrinkly drooly model for this shot: 6. To finish I sewed a button on one end and cut a slip for a button hole on the other end. Again, since the fleece doesn't really ravel a simple slit for a button hole works just fine! Two nieces' Christmas gifts in one night... results girl to the rescue!!!
**No animals were hurt in the making of this tutorial, just a little embarrassed ;-) This was a very quick and easy Christmas gift project. Here is what you need: 1 soft sweater from the thrift store, or back of you closet. Scissors Embroidery thread (I used red yarn) Needle Sewing machine 1. Cut off the sleeves of the sweater: Cut out the shape shown below to make a thumb hole. Turn the glove inside out. Sew along the "J" if that makes sense. Leaving the tops open for the thumb and fingers. They were a little looser than I wanted them to be so I also took them in a bit. You can see some of that in the picture below. To finish the tops of the gloves I attempted my first blanket stitch! I did not have any embroidery thread, so I used a thin yarn I had on hand. Ha, "on hand?" Yup, I said it! It turned out OK, but would be better with different thread I think. Here is the tutorial I watched for the blanket stitch: I added initials since these were going to be a gift! You can see my new labels in the picture below... I will show you how I made those in another post to come! All done, and now I get to find another project for the rest of the sweater!! Any ideas? I was thinking a cowl neck warmer, or shoulder shrug...?
|