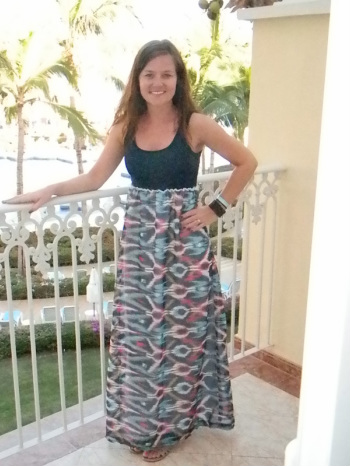
One way to get a project done is to have an approaching deadline, anyone feel me?! So for this dress I had a FREE trip to CABO SAN LUCAS to help promote my speediness! Alex's job with Pernod Ricard flew about 30 of us to Cabo for a vacation; and although it was an all expenses paid trip, I still did not find the desire to spend a lot of dough on a new wardrobe--enter the tank top maxi that has been on my list. Here is the final product: (I felt comfortable modeling it thanks to a couple of sun-kissed days on my normally see-through white Norwegian skin!!)
So there is a hilarious story behind this dress; however, an important lesson was learned. As you might know, I enjoy the process of creating and figuring out things myself rather than following a pattern or tutorial step by step. So my STYLIN sister in law, Nikki, wore a dress similar to this last summer and I naturally took a real close look and filed it into my brain's section labeled, "I could make that". I knew I would need a tank top and a light fabric like chiffon, and figured out that I needed to learn how to sew with elastic thread for the waist. So I found a tutorial that I could "follow": http://asmallsnippet.blogspot.com/search/label/sewing
Here is where it gets good. I followed the tutorial pretty closely and cut my tank top, and cut a large rectangle for the skirt & lining. I now realize that I inferred that the skirt shape was a rectangle because once I had the full dress put together the bottom was so small around my ankles I had to take tiny little geisha girl steps!! hahahaha I wish I would have been filming at this point, might have gone viral!! So then it gets worse because I decided to add a small triangle piece to the bottom in the back, which did make the bottom wider, but also made it look like a bustled wedding dress!! Yuck!!
Sooooo lesson learned, when using non-stretch material, always cut your skirt in a triangle/trapezoid shape!!

This is how I ended up with this first dress, now short. Luckily it was a fixable mistake. So if you want to attempt your own short or long maxi tank dress here is what you need:
tank top ($9 at Target)
elastic thread (woven loosely on bobbin)
2 yards chiffon fabric (I had some left over)
2 yards lining fabric (again, had left overs)
tank top ($9 at Target)
elastic thread (woven loosely on bobbin)
2 yards chiffon fabric (I had some left over)
2 yards lining fabric (again, had left overs)
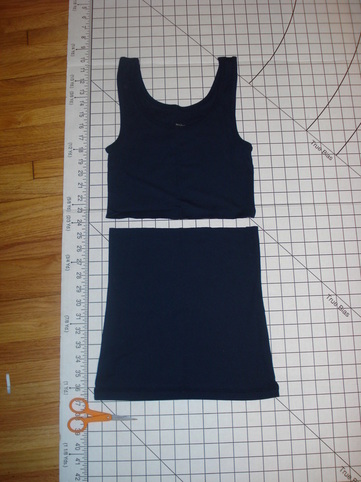
1. I cut my tank top about 6 inches down from the armpit.
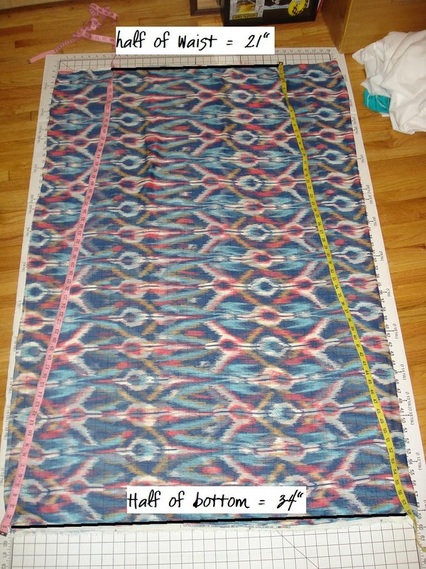
2. Here is how I cut the second skirt (the trapezoid shape). I measured around my waist 1.5 times and got 42". So since I was cutting a front and back piece for my skirt I divided that number in half to get my waist measurement of 21" for each piece. Cut the same skirt pieces for the lining.
3. Place the front and back pieces of the skirt right sides together and sew up the sides (where my pink and yellow tape measures are in the picture above).
4. Place the front and back pieces of the lining wrong sides together and sew up the sides. You want wrong sides together (if there is right and wrong of your lining fabric) because you wan the seams to face the inside of the skirt, not be on your legs.
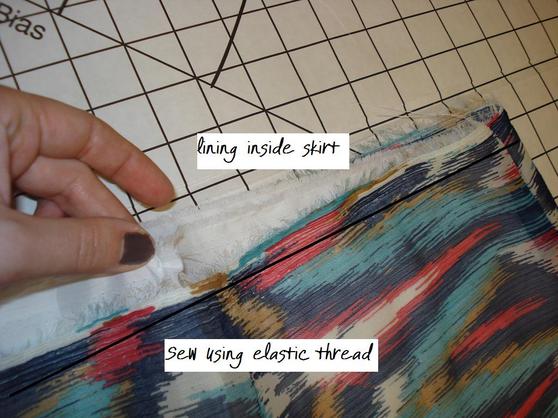
5. Put the lining inside the skirt (with the seams facing each other so the lining seams aren't rubbing on your legs) . Now you are ready to sew with the elastic thread! Use the blog I mentioned earlier in this post for clarification. Wind the elastic thread loosely around the bobbin and sew around the waist (sewing the lining and skirt together).
4. Place the front and back pieces of the lining wrong sides together and sew up the sides. You want wrong sides together (if there is right and wrong of your lining fabric) because you wan the seams to face the inside of the skirt, not be on your legs.
5. Put the lining inside the skirt (with the seams facing each other so the lining seams aren't rubbing on your legs) . Now you are ready to sew with the elastic thread! Use the blog I mentioned earlier in this post for clarification. Wind the elastic thread loosely around the bobbin and sew around the waist (sewing the lining and skirt together).
6. The fabric should naturally gather as you sew, no need to pull or push anything. Now you are ready to place your tank top inside the gathered waist. I like the look of the rough edge on top of the tank top so I sewed right on the outside of the skirt and tank. Don't forget to use elastic thread in the bobbin again!
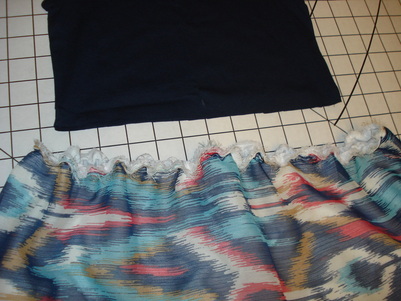
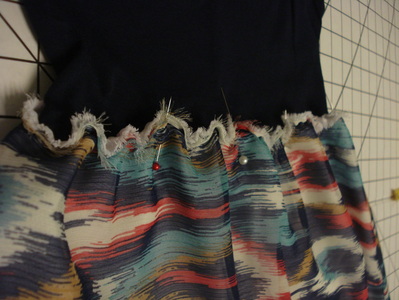
This was a little awkward to pin, but I just took my time and wrestled with it a bit until I got it.
7. Once you have the skirt pinned to the tank you can sew with elastic thread again right next to the first stitch. Then hem the bottom of the lining and skirt and your done!! Let's hope you don't have a geisha problem like it did ;-)
7. Once you have the skirt pinned to the tank you can sew with elastic thread again right next to the first stitch. Then hem the bottom of the lining and skirt and your done!! Let's hope you don't have a geisha problem like it did ;-)


Let me know what you think!! What kinds of things motivate you to get a project done? Anyone else have any comical sewing mistakes lately?!
 RSS Feed